
PERSIA (Parallel rEcommendation tRaining System with hybrId Acceleration) is developed by AI platform@Kuaishou Technology, collaborating with ETH. It is a PyTorch-based (the first public one to our best knowledge) system for training large scale deep learning recommendation models on commodity hardware. It is capable of training recommendation models with up to 100 trillion parameters. To the best of our knowledge, this is the largest model size in recommendation systems so far. Empirical study on public datasets indicate PERSIA's significant advantage over several other existing training systems in recommendation (see benchmark for details). Its efficiency and robustness have also been validated by multiple applications with 100 million level DAU at Kuaishou.
In the News
- AI Engines in the "Short-video" Era: Eating 100 Trillion Parameters, Invited talk, Facebook, 2021.
- 单机训练速度提升 640 倍!独家解读快手商业广告模型 GPU 训练平台 PERSIA (In Chinese. Title: 640x Faster GPU Based Learning System for Ad Recommendation)
- 创新、平衡与大格局:快手商业化的慢与快 (In Chinese. Title: Innovation, Balance, and Big Picture: The Speed of Kwai Commercialization)
Links
Discussion
Feel free to join our Telegram Group for discussion!
References
-
Xiangru Lian, Binhang Yuan, Xuefeng Zhu, Yulong Wang, Yongjun He, Honghuan Wu, Lei Sun, Haodong Lyu, Chengjun Liu, Xing Dong, Yiqiao Liao, Mingnan Luo, Congfei Zhang, Jingru Xie, Haonan Li, Lei Chen, Renjie Huang, Jianying Lin, Chengchun Shu, Xuezhong Qiu, Zhishan Liu, Dongying Kong, Lei Yuan, Hai Yu, Sen Yang, Ce Zhang, & Ji Liu. (2021). Persia: A Hybrid System Scaling Deep Learning Based Recommenders up to 100 Trillion Parameters.
-
Ji Liu & Ce Zhang. (2021). Distributed Learning Systems with First-order Methods.
License
This source code is licensed under the MIT license found in the LICENSE file in the root directory of this source tree.
Getting Started
- Run on Kubernetes with PERSIA Operator (Recommended)
- Run Manually
- Deploy Trained Model for Inference
Run on Kubernetes with PERSIA Operator (Recommended)
By taking advantage of PERSIA K8s operator's automation, you can start a PERSIA training task with a few instructions.
Requirements
kubectlcommand-line tool- valid
kubeconfigfile (by efault located at~/.kube/config)
Installation
kubectl apply -f https://github.com/nats-io/nats-operator/releases/latest/download/00-prereqs.yaml
kubectl apply -f https://github.com/nats-io/nats-operator/releases/latest/download/10-deployment.yaml
kubectl apply -f https://raw.githubusercontent.com/PersiaML/PERSIA/main/k8s/resources/jobs.persia.com.yaml
kubectl apply -f https://raw.githubusercontent.com/PersiaML/PERSIA/main/k8s/resources/operator.persia.com.yaml
NOTE: It can take a few minutes to start the
operatordue to container image pulling.
Run
To run a simple example training task (adult income prediction), apply the following Kubernetes PERSIA task definition file:
kubectl apply -f https://raw.githubusercontent.com/PersiaML/PERSIA/main/k8s/example/adult-income-prediction.train.yml
This runs the adult income prediction training task defined by adult-income-prediction.train.yml. This file defines system configuration (e.g. resources limit, volume mounts) and environment variables (with paths to embedding, model and data configuration files) of a PERSIA training task.
To run a customized training task on your own dataset and models, you can edit the following configuration files (see customization for more details):
- Embedding configuration file: A file defining the embedding configurations (e.g. embedding dimension, and sum pooling). This file is named as
embedding_config.yamlby default. For more details see embedding config. - Embedding PS configuration file: Configuration of embedding parameter servers, e.g. max capacity of embedding parameter servers. This file is named as
global_config.yamlby default. For more details see global config. - Model definition configuration file: A file that defines the neural network (NN) using PyTorch. This file is named as
train.pyby default. For more details see model definition. - Data preprocessing configuration file: A file that defines the data preprocessing. This file is named as
data_loader.pyby default. For more details see training data.
The location of these files can be specified using the environment variables PERSIA_EMBEDDING_CONFIG, PERSIA_GLOBAL_CONFIG, PERSIA_NN_WORKER_ENTRY, PERSIA_DATALOADER_ENTRY respectively. For more
details on how to customize these environment variables, see
launcher configuration.
Run Manually
To launch the PERSIA adult income prediction training task manually, the first step is to download the corresponding dataset and preprocess the train data and test data. We have prepared the script to help you to finish this step.
git clone https://github.com/PersiaML/PERSIA.git
cd PERSIA/examples/src/adult-income/data && ./prepare_data.sh
Now you can start your first PERSIA training task with one of the following methods.
Using Docker-Compose
Docker-compose is a tool for defining and running multi-container docker applications. By modifying the docker-compose.yml file, you can customize the PERSIA training task (such as image, replicas). See PERSIA docker-compose configuration for more details.
Requirements
Run
Use the following instructions to start your PERSIA training task after installing the requirements.
cd examples/src/adult-income && make run
Using Python Package
You are free to modify PERSIA source code and build your customized PERSIA Python package.
Requirements
Acquiring PERSIA Python package
There are methods to acquire a PERSIA Python package.
- Using Pre-compiled Wheels
Wheels (precompiled binary packages) are available for Linux (x86_64). Package names are different depending on your CUDA Toolkit version (CUDA Toolkit version is shown in nvcc --version). All of these precompiled binary packages need Python greater than 3.6.
| CUDA Toolkit version | Installation command |
|---|---|
| None (CPU version) | pip3 install persia |
| >= v10.2 | pip3 install persia-cuda102 |
| >= v11.1 | pip3 install persia-cuda111 |
| >= v11.3 | pip3 install persia-cuda113 |
- From Source
Use following instructions to build PERSIA Python packages from source (Ubuntu 20.04 & Windows 10. It should be similar on other OSes).
Note: You need to set environment variable
USE_CUDA=1to add CUDA support (for GPU training). In this case, the CUDA runtime path should be already present inLD_LIBRARY_PATH.
apt update && apt-get install -y curl build-essential git python3 python3-dev python3-pip

export RUSTUP_HOME=/rust
export CARGO_HOME=/cargo
export PATH=/cargo/bin:/rust/bin:PATH
curl -sSf https://sh.rustup.rs | sh -s -- --default-toolchain nightly -y --profile default --no-modify-path

git clone https://github.com/PersiaML/PERSIA.git && cd PERSIA

# To install CUDA version
USE_CUDA=1 NATIVE=1 pip3 install .

# To install CPU version
NATIVE=1 pip3 install .
Python3, Perl and Rust are required.
git clone https://github.com/PersiaML/PERSIA.git && cd PERSIA

# To install CUDA version
USE_CUDA=1 NATIVE=1 pip3 install .

# To install CPU version
NATIVE=1 pip3 install .
Run
After installing the PERSIA Python package locally, you are able to launch the example adult income prediction training task with:
cd examples/src/adult-income
honcho start -e .honcho.env
For more configuration options see Customization.
Deploy Trained Model for Inference
See Inference.
Customization
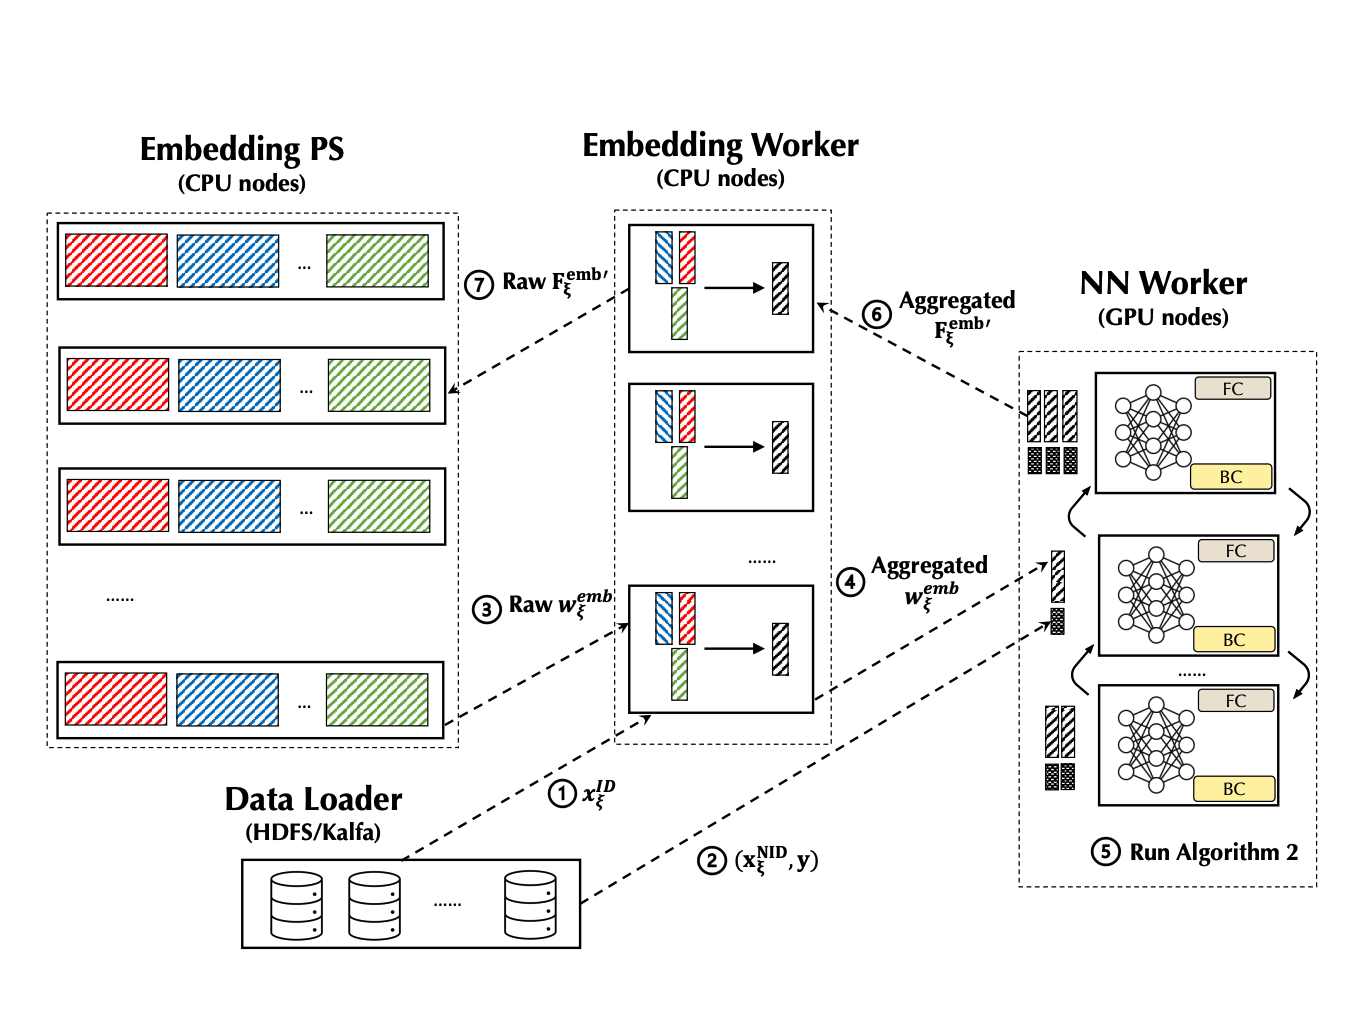
Before we introduce how to customize a PERSIA training task, let's take a look at how PERSIA's different components work together. The training process can be summarized by the following figure:
-
The data loader will dispatch the ID type feature xID(.) to an embedding worker, where the embedding worker will generate a unique sample ID for this sample, buffer this sample ID with the ID type feature xID locally, and return this unique sample ID back the data loader. The data loader will then associate this sample’s Non-ID type features and labels with this unique ID.
-
Next, the data loader will dispatch the Non-ID type feature and label(s) (xNID, y) to an NN worker.
-
Once an NN worker receives this incomplete training sample, it will issue a request to pull the ID type features’(xID) embedding wemb from some embedding worker according to the sample ID . This will trigger the forward propagation according to asynchronous updating algorithm for embeddings, where the embedding worker will use the buffered ID type feature xID to get the corresponding wemb from the embedding PS.
-
Then the embedding worker performs some potential aggregation of original embedding vectors. When this computation finishes, the aggregated embedding vector wemb will be transmitted to the NN worker that issues the pull request.
-
Once the NN worker gets a group of complete inputs for the dense module, it will create a mini-batch and conduct the training computation of the NN according to synchronous updating algorithm for NN parameters. Note that the parameter of the NN always locates in the device RAM of the NN worker, where the NN workers synchronize the gradients by the AllReduce Paradigm.
-
When the iteration of synchronous updating is finished, the NN worker will send the gradients of the embedding (Femb') back to the embedding worker (also along with the sample ID ).
-
The embedding worker will query the buffered ID type feature xID according to the sample ID , compute gradients Femb' of the embedding parameters and send the gradients to the embedding PS. Finally, the embedding PS will compute the updates to the embedding parameters using the gradients and update the embedding parameters.
There are a few files you can customize in PERSIA:
- Data preprocessing configuration file:
data_loader.py, the file location can be specified using the environment variablePERSIA_DATALOADER_ENTRY. See Training Data for details. - Model definition configuration file:
train.py, the file location can be specified using the environment variablePERSIA_NN_WORKER_ENTRY. See Model Definition for details. - Embedding configuration file:
embedding_config.yaml, the file location can be specified using the environment variablePERSIA_EMBEDDING_CONFIG. See Embedding Configuration for details. - Embedding PS configuration file:
global_config.yaml, the file location can be specified using the environment variablePERSIA_GLOBAL_CONFIG. See Configuring Embedding Parameter Server for details. - Launcher configuration:
- If you are using K8s,
k8s.train.yaml. See K8s launcher for details. - If you are using docker compose,
docker-compose.ymland.docker.env. See Docker Compose Launcher for details. - If you are using honcho,
Procfileand.honcho.env. See Honcho Launcher for details.
- If you are using K8s,
Training Data
In PERSIA, we use the PersiaBatch data structure to encode the training data. PersiaBatch typically consists of three parts: ID Type Feature, Non-ID Type Feature and Label.
Add ID Type Feature
IDTypeFeature declares categorical data with variable length. It is a sparse matrix (List[np.array]) in LIL format. Note that it only accepts np.uint64 elements.
For example, you can put user_id and photo_id data into the IDTypeFeature separately.
import numpy as np

from persia.embedding.data import IDTypeFeature

id_type_features = []

# add user_id data
user_id_batch_data = [
  np.array([1000, 1001], dtype=np.uint64),
  np.array([1000,], dtype=np.uint64),
  np.array([], dtype=np.uint64), # allow empty sample
  np.array([1000, 1001, 1024], dtype=np.uint64),
  np.array([1000,] * 200, dtype=np.uint64),
]
id_type_features.append(IDTypeFeature(user_id_batch_data, "user_id"))

# add photo_id data
photo_id_batch_data = [
  np.array([2000, 1001], dtype=np.uint64),
  np.array([3000,], dtype=np.uint64),
  np.array([5001], dtype=np.uint64),
  np.array([4000, 1001, 1024], dtype=np.uint64),
  np.array([4096,] * 200, dtype=np.uint64),
]
id_type_features.append(IDTypeFeature(photo_id_batch_data, "photo_id"))
After generating IDTypeFeature, you have to config this id_type_feature in embedding_config.yml. See configuration for more details about how to config the id_type_feature, such as dim, sqrt_scaling, etc.
more advanced features: id_type_feature processing
Add Non-ID Type Feature
You are also able to add multiple NonIDTypeFeature into a PersiaBatch with various datatype. Stacking multiple non_id_type_features with same datatype horizontally into one np.array can avoid memory fragmentation and reduce the time of type check. For example, you are able to add the NonIDTypeFeature with datatype in float32, uint8 or else.
import numpy as np

from persia.embedding.data import NonIDTypeFeature

non_id_type_features = []

# height data
height_batch_data = np.array([
  [170],
  [183],
  [175],
  [163],
  [177],
], dtype=np.float32)

non_id_type_features.append(NonIDTypeFeature(height_batch_data, name="height"))

# income data
income_batch_data = np.array([
  [37000],
  [7000],
  [2000],
  [6660],
  [3000],
], dtype=np.float32)

non_id_type_features.append(
  NonIDTypeFeature(income_batch_data, name="income")
)

# add income_with_height
income_with_height = np.hstack([height_batch_data, income_batch_data])
non_id_type_features.append(
  NonIDTypeFeature(income_with_height, name="income_with_height")
)

# add five image data with RGB channel
image_data = np.ones((5, 224, 224, 3), dtype=np.uint8)
non_id_type_features.append(NonIDTypeFeature(image_data, name="LSVR_image"))
more advanced features: non_id_type_feature processing
Add Label
Adding a label is the same as the NonIDTypeFeature. You can add label data with different datatypes such as bool, float32, etc.
import numpy as np

from persia.embedding.data import Label

labels = []
# Add ctr label data
ctr_batch_data = np.array([
  0,
  1,
  0,
  1,
  1
], dtype=np.bool)

labels.append(Label(ctr_batch_data, name="ctr"))

# Add income label data
income_batch_data = np.array([
  [37000],
  [7000],
  [2000],
  [6660],
  [3000],
], dtype=np.float32)
labels.append(Label(income_batch_data, name="income"))

# Add ctr with income, but will cost
# extra bytes to cast ctr_batch_data from bool to float32
ctr_with_income = np.hstack([ctr_batch_data, income_batch_data])
labels.append(Label(ctr_with_name, "ctr_with_income"))
more advanced features: label processing
Send PersiaBatch
Use persia.ctx.DataCtx to send PersiaBatch to nn_worker and embedding_worker:
import numpy as np

from persia.ctx import DataCtx
from persia.embedding.data import PersiaBatch, IDTypeFeature

id_type_features = [
  IDTypeFeature("empty_sample", np.array([[]] * 5, dtype=np.uint64))
]

persia_batch = PersiaBatch(
  id_type_features,
  requires_grad=False
)

with DataCtx() as ctx:
  ctx.send_data(persia_batch)
Model Definition
Model definition includes the following three parts.
Define DNN Model
You can define the DNN model structure any way you want. Only note that the signature of the forward function should be the same as shown below.
from typing import List

import torch

class DNN(torch.nn.Module):
    def forward(
      self,
      non_id_type_feature_tensors: List[torch.Tensor],
      id_type_feature_embedding_tensors: List[torch.Tensor]
    ):
        ...

model = DNN()
Modify Embedding Optimizer
There are several kinds of embedding optimizers in PERSIA. For more details, see api doc.
from persia.embedding.optim import SGD, Adagrad, Adam
from persia.ctx import TrainCtx

sgd_embedding_optimizer = SGD(1e-3)
adagrad_embedding_optimizer = Adagrad(1e-3)
adam_embedding_optimizer = Adam(1e-3)
Customize PERSIA Training Context
After model and embedding optimizer have been defined, a PERSIA training context should be created to acquire the Dataloder and manage the embedding.
# train.py

from torch import nn
from torch.optim import SGD

from persia.ctx import TrainCtx
from persia.data import StreamingDataset, Dataloader
from persia.env import get_local_rank
from persia.embedding.optim import Adagrad

prefetch_size = 10
dataset = StreamingDataset(prefetch_size)

local_rank = get_local_rank()

device_id = get_local_rank()
torch.cuda.set_device(device_id)
model.cuda(device_id)

# DNN parameters optimizer
dense_optimizer = SGD(model.parameters(), lr=0.1)
# Embedding parameters optimizer
embedding_optimizer = Adagrad(lr=1e-3)

with TrainCtx(
    model=model,
    embedding_optimizer=embedding_optimizer,
    dense_optimizer=dense_optimizer,
    device_id=device_id,
) as ctx:

    train_data_loader = Dataloader(dataset)
    for (batch_idx, data) in enumerate(loader):
      ...
more advanced features: TrainCtx
Configuring Embedding Worker
An embedding worker runs an asynchronous updating algorithm for getting the embedding parameters from the embedding parameter server, aggregating embedding vectors (potentially) and putting embedding gradients back to the embedding parameter server. If you are interested in the details of the system design, please refer to Section 4.2 in our paper. In most of the cases, the only configuration you need to adjust is the number of instances and resources, based on your workload. See K8s launcher.
Configuring Embedding Parameter Server
An embedding parameter server manages the storage and update of the embedding parameters according to LRU policies. So you need to configure the capacity of the LRU cache in the configuration file according to your workload and available memory capacity. In addition, the capacity of embedding-parameter-server means the max number of embedding vectors, not the number of parameters. Here is an example:
# global_config.yaml

common_config:
  job_type: Train
embedding_parameter_server_config:
  capacity: 1000000
more advanced features: See Configuration
Launcher Configuration
There are several launchers to help you launch a PERSIA training task.
- K8s launcher: Kubernetes launcher is the easiest for deploying large-scale training.
- docker-compose launcher: Docker compose is another way like
K8sbut is more lightweight. - honcho launcher: You can build PERSIA (Currently persia can build in linux, macOS, windows10) manually when using a Procfile manager, which is friendly for developers.
All of these launchers use environment variables(PERSIA_GLOBAL_CONFIG, PERSIA_EMBEDDING_CONFIG, PERSIA_NN_WORKER_ENTRY, PERSIA_DATALOADER_ENTRY) to assign the path of the PERSIA configuration files.
K8s Launcher
When launching PERSIA training tasks with K8s, PERSIA is added as a custom resource to your Kubernetes cluster, defined using CustomResourceDefinition (CRD).
Here is an example of a PERSIA CRD:
# k8s.train.yaml

apiVersion: persia.com/v1
kind: PersiaJob
metadata:
  name: adult-income  # persia job name, need to be globally unique
  namespace: default  # k8s namespace to deploy to this job
spec:
  # path of PERSIA configuration files.
  persiaEnv:
    PERSIA_GLOBAL_CONFIG: /home/PERSIA/examples/src/adult-income/config/global_config.yml
    PERSIA_EMBEDDING_CONFIG: /home/PERSIA/examples/src/adult-income/config/embedding_config.yml
    PERSIA_NN_WORKER_ENTRY: /home/PERSIA/examples/src/adult-income/train.py
    PERSIA_DATALOADER_ENTRY: /home/PERSIA/examples/src/adult-income/data_loader.py
  env:
    - name: PERSIA_NATS_URL
      value: nats://persia-nats-service:4222  # hostname need to be same with nats operator's name

  embeddingParameterServer:
    replicas: 1
    resources:
      limits:
        memory: "24Gi"
        cpu: "4"

  embeddingWorker:
    replicas: 1
    resources:
      limits:
        memory: "24Gi"
        cpu: "4"

  nnWorker:
    replicas: 1
    nprocPerNode: 1
    resources:
      limits:
        memory: "24Gi"
        cpu: "12"
        nvidia.com/gpu: "1"
    env:
      - name: CUBLAS_WORKSPACE_CONFIG
        value: :4096:8
      - name: ENABLE_CUDA
        value: "1"

  dataloader:
    replicas: 1
    resources:
      limits:
        memory: "8Gi"
        cpu: "1"

---
# a nats operator
apiVersion: "nats.io/v1alpha2"
kind: "NatsCluster"
metadata:
  name: "persia-nats-service"
spec:
  size: 1
  natsConfig:
    maxPayload: 52428800
  resources:
    limits:
      memory: "8Gi"
      cpu: "2"
more advanced features: See kubernetes-integration
Docker Compose Launcher
.docker.env and docker-compose.yml are the files you can customize when launching PERSIA training task with docker-compose. The following are steps to customize a PERSIA training task.
Configuring Environment
You are able to set PERSIA task environment variables following the Docker official docs.
The Environment definition:
PERSIA_EMBEDDING_CONFIG: Path to PERSIA embedding configuration file.PERSIA_GLOBAL_CONFIG: Path to PERSIA embedding PS configuration file.LOG_LEVEL: log level forembedding-workerandembedding-parameter-server.
# .docker.env

PERSIA_NN_WORKER_ENTRY=/workspace/train.py
PERSIA_DATALOADER_ENTRY=/workspace/data_loader.py
PERSIA_EMBEDDING_CONFIG=/workspace/config/embedding_config.yml
PERSIA_GLOBAL_CONFIG=/workspace/config/global_config.yml.yml

LOG_LEVEL=info
Configuring Docker-Compose File
You can add multiple data_loader, embedding_worker and embedding_parameter_server services by the following configuration.
version: "3.2"
services:
  data_loader1:
    env_file:
      - .docker.env
    depends_on:
      - nn_worker
      - embedding_worker
      - persia_nats_service
    image: persiaml/persia-cuda-runtime:latest
    command: persia-launcher data-loader --replica-index 0 --replica-size 2
    volumes:
      - type: bind
        source: . # mount current directory into container
        target: /workspace
    deploy:
      restart_policy:
        condition: on-failure

  data_loader2:
    env_file:
      - .docker.env
    depends_on:
      - nn_worker
      - embedding_worker
      - persia_nats_service
    image: persiaml/persia-cuda-runtime:latest
    command: persia-launcher data-loader --replica-index 1 --replica-size 2
    volumes:
      - type: bind
        source: .
        target: /workspace
    deploy:
      restart_policy:
        condition: on-failure
NOTE: You can also use the
replicaskeyword in docker-compose swarm mode to launch multiple services at once. But you will need to parse the .TASK.SLOT intoreplica_indexand feed it todata-loader.
Honcho Launcher
It is possible to simulate distributed environment when using Honcho launcher. You may need to customize these files: Procfile, .honcho.env.
Configuring Env
There are two environment variables that you can customize when launching a PERSIA task with Honcho:
PERSIA_NATS_URL: set for nats-server url.LOG_LEVEL: set log_level forembedding-workerandembedding-parameter-server.
# .honcho.env
# default nats_server ip address
PERSIA_NATS_URL=nats://0.0.0.0:4222

LOG_LEVEL=info
Configuring Procfile
You can add multiple replicas of PERSIA modules in Procfile.
For example, by adding embedding_parameter_server0, embedding_parameter_server1 and embedding_parameter_server2, you can launch three subprocesses of embedding_parameter_server in different web server ports.
# Procfile

# launch three subprocesses of embedding parameter server
embedding_parameter_server0: persia-launcher embedding-parameter-server --embedding-config config/embedding_config.yml --global-config config/global_config.yml --replica-index 0 --replica-size 3 --port 10000
embedding_parameter_server1: persia-launcher embedding-parameter-server --embedding-config config/embedding_config.yml --global-config config/global_config.yml --replica-index 1 --replica-size 3 --port 10001
embedding_parameter_server2: persia-launcher embedding-parameter-server --embedding-config config/embedding_config.yml --global-config config/global_config.yml --replica-index 2 --replica-size 3 --port 10002
Build PERSIA Runtime Image Locally
You can also build PERSIA runtime image from source code, and use your customized docker image to launch a PERSIA training task by both Kubernetes and docker-compose.
Use the following instructions to build persia-runtime-image:
git clone https://github.com/PersiaML/PERSIA.git
# docker image name: persiaml/persia-cuda-runtime:dev
cd PERSIA && IMAGE_TAG=dev make build_cuda_runtime_image -e
Deploy Trained Model for inference
See Inference.
Benchmark
We perform a series of large-scale training experiments to demonstrate the scalability and speed of PERSIA on open-source benchmarks as well as production recommendation workflows. Comparing to SOTA recommender systems, PERSIA provides significant boost to end-to-end training time, provide high training throughput and scale out well up to trillion-parameter scale models.
Setup
Benchmark Dataset
We evaluate PERSIA over three open-source benchmarks and one real-world production microvideo recommendation workflow at Kwai:
- Taobao-Ad: predict the advertisement CTR from Taobao’s website for 8 days with 26 million records.
- Avazu-Ad: predict the advertisement CTR of Avazu’s log for 11 days with 32 million records.
- Criteo-Ad: predict the advertisement CTR of Criteo’s traffic for 24 days with 44 million records.
- Kwai-Video (confidential production dataset): predict the explicit behavior of Kwai’s active users about the microvideo recommendation in 7 days with 3 billion records.
For the three open source advertisement CTR benchmarks, we include 80% of the records as training set and the rest 20% of the records as test set. We consider a fully connected feed forward neural network (FFNN) as the deep learning model with five hidden layer dimensions of 4096, 2048, 1024, 512 and 256. For the Kwai production microvideo recommendation task, 85% of the data are included in the training set while the rest 15% are considered as the test set. We also use FFNN as the model to predict multiple user behaviors.
Baseline
We consider two state-of-the-art baselines: XDL and PaddlePaddle. XDL is a specialized distributed recommendation framework developed by Alibaba. PaddlePaddle is a general purpose deep learning framework from Baidu with a special Heter mode that implements the design of AIBox, Baidu’s recommendation training system. 1
Cluster Setup
We include up to 64 Nvidia V100 GPUs, and 100 CPU instances (each with 52 cores and 480 GB RAM). The instances are connected by a network with bandwidth of 100 Gbps. The baseline systems (XDL and PaddlePaddle) are equipped with the same amount of computation resources for each individual setting.
End-to-end Performance

The figure above illustrates the convergence behaviors of different systems. We see that the PERSIA hybrid algorithm shows almost identical convergence when comparing with the fully synchronous mode. We see that test AUC gap between the hybrid mode and synchronous mode is always less than 0.1% in the three open-source benchmarks, and less than 0.001% in the production Kwai-video benchmark; by contrast, the gap between the asynchronous mode and the synchronous mode is much higher (from 0.5% to 1.0%); further, as we allow more aggressive asynchronicity in PaddlePaddle, the gap is more significant.
Scalability: Number of Workers

Above figure illustrates significant performance improvements from PERSIA: e.g., for the Taobao-Ad benchmark, PERSIA is 7.12× and 8.4× faster than that of the synchronous and asynchronous modes of XDL, and 1.71× faster than PaddlePaddle–same level of speedup also appears in the Avazu-Ad and Criteo-Ad benchmark.
Scalability: Number of Parameters
The intensive test of PERSIA's capacity is conducted over Google cloud platform with a heterogeneous cluster including:
- 8 a2-highgpu-8g instances (each with 8 Nvidia A100 GPUs) as NN workers;
- 100 c2-standard-30 instances (each with 30 vCPUs, 120 GB RAM) as embedding workers;
- 30 m2-ultramem-416 instances (each with 416 vCPUs, 12 TB RAM) as embedding PS.

We see that PERSIA shows stable training throughput when increasing the model size even up to 100 trillion parameters. Even for the 100 trillion-parameter model, PERSIA still achieves 2.6× higher throughput than the fully synchronous mode.
According to private communications we had with members of the PaddlePaddle development community.
Troubleshooting
Debugging running task in distributed training can be difficult. We provide some general suggestions in this page.
Debug Log
You can set the logging verbosity with LOG_LEVEL environment variable when
launching PERSIA. The value of LOG_LEVEL can be debug, info, warn, or
error. The default value is info.
Grafana Metrics
PERSIA integrates Prometheus to report useful metrics during training phase. This includes current embedding staleness, current total embedding size, the time cost of each stage during an iteration, and more. See Monitoring for more details.
Data Processing
You can use PersiaBatch to declare a batch of data in various types, shapes and implications.

- Processing ID Type Feature
- Non-ID Type Feature and Label
- Processing Meta Data
- PersiaBatch Processing Complete Example
Processing ID Type Feature
An ID type feature is a sparse matrix that contains variable length of discrete values. PERSIA converts these discrete valuess to embeddings by looking up from embedding-worker. The conversion rules are different for different id_type_feature, see embedding config for more details.
In addition, PersiaBatch only accepts IDTypeFeature or IDTypeFeatureWithSingleID with np.uint64 datatype.
ID Type Feature with Variable Length
The following code shows how to convert an id_type_feature with variable length to LIL sparse matrix with fixed sample size.
import numpy as np

from persia.embedding.data import PersiaBatch, IDTypeFeature


id_type_feature_names = [
    "gender", "user_id", "photo_id"
]

gender_data = [
    [0],
    [1],
    [0],
    [0],
    [1]
]

user_id_data = [
    [100001, 100003, 100005, 100020],
    [100001],
    [100001, 200001, 300001],
    [400001, 100001],
    [100001]
]

photo_id_data = [
    [400032, 400031],
    [400032, 400332, 420032, 400332,],
    [400032],
    [], # support empty id_type_feature but still need to add it to keep batch construction
    [400032, 401032, 400732, 460032, 500032]
]

id_type_feature_data = [
    gender_data, user_id_data, photo_id_data
]

batch_size = 5
id_type_features = []

for id_type_feature_idx, id_type_feature_name in enumerate(id_type_feature_names):
    id_type_feature = []
    for batch_idx in range(batch_size):
        id_type_feature.append(
            np.array(
                id_type_feature_data[id_type_feature_idx][batch_idx: batch_idx + 1],
                 dtype=np.uint64
            ).reshape(-1)
        )
    id_type_features.append(
        IDTypeFeature(id_type_feature_name, id_type_feature)
    )
ID Type Feature with Single ID
The below code shows how to process data who have only one ID for each sample.
import numpy as np

from persia.embedding.data import PersiaBatch, IDTypeFeatureWithSingleID


id_type_feature_names = [
    "gender", "user_id", "photo_id"
]

id_type_feature_data = np.array([
    [0, 100001, 200001],
    [1, 100002, 300002],
    [0, 100003, 400002],
    [0, 100005, 410002],
    [1, 100006, 400032],
], dtype=np.uint64)

batch_size = 5
start = 0
id_type_features = []

for id_type_feature_idx, id_type_feature_name in enumerate(id_type_feature_names):
    id_type_feature = []
    id_type_features.append(
        IDTypeFeatureWithSingleID(
            id_type_feature_name,
            id_type_feature_data[start: start + batch_size,id_type_feature_idx]
        )
    )
Non-ID Type Feature and Label
Non-ID type features and Labels are tensors with various data type and shape. They must have the same batch size with id_type_feature in a PersiaBatch.
The best practice is to stack data with the same type and then append it to non_id_type_features, instead of appending one by one.
Datatype supported in NonIDTypeFeature and Label:
| numpy.dtype |
|---|
| np.bool |
| np.int8 |
| np.int16 |
| np.int32 |
| np.int64 |
| np.float32 |
| np.float64 |
| np.uint8 |
Here is an example:
import numpy as np

from persia.embedding.data import NonIDTypeFeature, Label

batch_size = 5

non_id_type_features = []
# add non_id_type_feature
# int8 image_embedding from DNN Extractor
non_id_type_features.append(NonIDTypeFeature(np.ones((batch_size, 256), dtype=np.int8)))
# general statistics such as average income, height, weight
# you can merge the non_id_type_feature together with same datatype
non_id_type_features.append(NonIDTypeFeature(np.eye((batch_size, 3) dtype=np.float32)))
# image_pixel_data or RS data with multiple dimension
non_id_type_features.append(NonIDTypeFeature(np.ones((batch_size, 3, 224, 224), dtype=np.int8)))

labels = []
# add label
# multiple labels classification
labels.append(Label(np.ones((batch_size, 4), dtype=np.bool)))
# regression label
labels.append(Label(np.ones((batch_size), dtype=np.float32)))
Processing Meta Data
There is an optional meta field in PersiaBatch to store unstructured data. You are able to serialize the object into bytes and add it into PersiaBatch.
import json
import pickle

import time
from persia.embedding.data import PesiaBatch, IDTypeFeature
batch_size = 5
id_type_features = [
    IDTypeFeature(
        "empty_id_type_feature_with_batch_size",
        [np.array([], dtype=np.uint64)] * batch_size)
]

meta_info = {
    "batch_id": 100000000,
    "timestamp": time.time()
}

meta_json_bytes = json.dumps(meta_info)
# Or use pickle serialize the meta_info
# meta_pickle_bytes = pickle.dumps(meta_info)

PersiaBatch(
    id_type_features,
    meta=meta_json_bytes
)
PersiaBatch Processing Complete Example
Here is a complete example of how to generate a PersiaBatch from raw data:
import json
import time

import numpy as np

from persia.embedding.data import PersiaBatch, IDTypeFeature, NonIDTypeFeature, Label

batch_size = 5

id_type_feature_names = [
    "gender", "user_id", "photo_id"
]

gender_data = [
    [0],
    [1],
    [0],
    [0],
    [1]
]

user_id_data = [
    [100001, 100003, 100005, 100020],
    [100001],
    [100001, 200001, 300001],
    [400001, 100001],
    [100001]
]

photo_id_data = [
    [400032, 400031],
    [400032, 400332, 420032, 400332,],
    [400032],
    [], # support empty id_type_feature but still need to add it to keep batch construction
    [400032, 401032, 400732, 460032, 500032]
]

id_type_feature_data = [
    gender_data, user_id_data, photo_id_data
]

id_type_features = []

for id_type_feature_idx, id_type_feature_name in enumerate(id_type_feature_names):
    id_type_feature = []
    for batch_idx in range(batch_size):
        id_type_feature.append(
            np.array(
                id_type_feature_data[id_type_feature_idx][batch_idx: batch_idx + 1],
                dtype=np.uint64
            ).reshape(-1)
        )
    id_type_features.append(IDTypeFeature(id_type_feature_name, id_type_feature))


non_id_type_features = []
# add non_id_type_feature
# int8 image_embedding from DNN Extractor
non_id_type_features.append(NonIDTypeFeature(np.ones((batch_size, 256), dtype=np.int8)))

# general statistics such as average income, height, weight
# you can merge the non_id_type_feature together with same datatype
non_id_type_features.append(NonIDTypeFeature(np.eye((batch_size, 3) dtype=np.float32)))

# image_pixel_data or RS data with multiple dimension
non_id_type_features.append(NonIDTypeFeature(np.ones((batch_size, 3, 224, 224), dtype=np.int8)))

labels = []
# add label
# multiple label classification task label
labels.append(Label(np.ones((batch_size, 4), dtype=np.bool), name="ctr_label"))

# regression task label
labels.append(Label(np.ones((batch_size), dtype=np.float32), name="income_label"))

meta_info = {
    "batch_id": 100000000,
    "timestamp": time.time()
}

persia_batch = PersiaBatch(
    id_type_features,
    non_id_type_features=non_id_type_features,
    labels=labels,
    requires_grad=True,
    meta=json.dumps(meta_info)
)
Training Context
A PERSIA training context manages training environments on NN workers.
- PERSIA Training Context Complete Example
- EmbeddingConfig
- Mixed Precision Training
- Distributed Option
PERSIA Training Context Complete Example
Here is a complete example for the usage of PERSIA training context.
import torch

from persia.ctx import TrainCtx
from persia.embedding.optim import Adagrad
from persia.env import get_rank, get_world_size
from persia.data import Dataloder, PersiaDataset, StreamingDataset

from model import DNN


if __name__ == "__main__":
    model = DNN()
    rank, world_size = get_rank(), get_world_size()

    device_id = 0
    torch.cuda.set_device(device_id)
    model.cuda(device_id)

    dense_optimizer = torch.optim.SGD(model.parameters(), lr=0.1)
    embedding_optimizer = Adagrad(lr=1e-2)
    loss_fn = torch.nn.BCELoss(reduction="mean")

    with TrainCtx(
        model=model,
        embedding_optimizer=embedding_optimizer,
        dense_optimizer=dense_optimizer,
        device_id=device_id,
    ) as ctx:
        train_dataloader = Dataloder(StreamingDataset(10))

        for (batch_idx, data) in enumerate(train_dataloader):
            (output, labels) = ctx.forward(data)
            loss = loss_fn(output, label[0])
            scaled_loss = ctx.backward(loss)
In the following section, we will introduce several configuration options when creating a PERSIA training context.
EmbeddingConfig
EmbeddingConfig defines embedding hyperparameters.
emb_initialization: The default initialization of PERSIA embedding isUniformdistribution. Value is a tuple of the lower and upper bound of embedding uniform initialization.admit_probability: The probability (0<=, <=1) of admitting a new embedding.weight_bound: Restrict each element value of an embedding in[-weight_bound, weight_bound].
from persia.embedding import EmbeddingConfig
from persia.ctx import TrainCtx

embedding_config = EmbeddingConfig(
    emb_initialization=(-1, 1),
    admit_probability=0.8,
    weight_bound=1
)

TrainCtx(
    embedding_config=embedding_config,
    ...
)
Mixed Precision Training
The mixed_precision feature in PERSIA training is only supported on gpu NN workers because it depends on pytorch amp.
Distributed Option
Distributed Option defines the implementation of data parallelism among PERSIA NN workers.
- DDP (by default): Native pytorch distributed training data parallelism implementation.
- Bagua: A deep learning training acceleration framework for PyTorch.
Configuring DDPOption
In DDPOption, you can configure the backend and init_method.
from persia.distributed import DDPOption

backend = "nccl"
# backend = "gloo"

init_method = "tcp"
# init_method = "file"

DDPOption(backend="nccl", init_method=init_method)
Configuring BaguaDistributedOption
There are several data parallelism implementations in Bagua, see Bagua Documentation to learn more about Bagua.
from persia.ctx import TrainCtx
from persia.distributed import BaguaDistributedOption

algorithm = "gradient_allreduce"
# algorithm = low_precision_decentralized
# algorithm = bytegrad
# algorithm = async

bagua_args = {}
bagua_option = BaguaDistributedOption(
    algorithm,
    **bagua_args
)

TrainCtx(
    distributed_option=bagua_option
)
Monitoring
Monitoring and alerting is crucial for a distributed system. PERSIA provides integration with Prometheus for this purpose.
Services in PERSIA push their metrics to a PushGateway, and the gateway then exposes these metrics to Prometheus.
Step to Enable Metrics in PERSIA
Enable Metrics in Configuration
Add the following configurations in global_config.yaml.
job_name(str) is a name to distinguish your job from others. It can be, for example, dlrm_v1.0.
PersiaMetricsConfig:
  enable_metrics: true
  job_name: your_job_name
Deploy PushGateway
See official documentation for details. Here is an example for deploying gateway by docker-compose.
The default push address on PERSIA services is metrics_gateway:9091, which can be overridden by the environment variable PERSIA_METRICS_GATEWAY_ADDR.
version: "3.3"
services:
    data_loader:
        ...

    nn_workler:
        ...

    embedding_worker:
        ...

    server:
        ...

    persia_nats_service:
        ...

    metrics_gateway:
        image: prom/pushgateway:latest
        deploy:
            replicas: 1

    prometheus:
        image: prom/prometheus:latest
        deploy:
            replicas: 1
        command: "--config.file=/workspace/config/prometheus.yml"

    grafana:
        image: grafana/grafana:latest
        ports:
            - "3000:3000/tcp"
        deploy:
            replicas: 1
        environment:
            GF_PATHS_PROVISIONING: /workspace/grafana/provisioning/
You can check what metrics are there by running
curl metrics_gateway:9091/metrics
in a service container.
By configuring the GF_PATHS_PROVISIONING environment variable, you can specify the grafana provisioning directory to access our preset grafana panels.
Collecting Metrics
To collect metrics from the gateway, you need a prometheus service to do that for you.
Details of how to setup a prometheus service in various environments can be found in prometheus documentation, for example docker_sd_config, kubernetes_sd_config or dockerswarm_sd_config.
Metrics in PERSIA
Accuracy related
| Key | Description |
|---|---|
index_miss_count | count of missing indices when lookup. There may be various reasons for the missing of embeddings, e.g. lookup a new index or the index has been evicted. |
index_miss_ratio | ratio of missing indices for all features when lookup for one batch. |
gradient_id_miss_count | number of missing indices when updating gradient. This will only happen when embedding was evicted before gradient update. |
estimated_distinct_id | estimated number of distinct indices for each feature. |
batch_unique_indices_rate | unique index rate in one batch. |
staleness | staleness of sparse model. The iteration of dense model run one by one, while the embedding lookup happened before concurrently. The staleness describe the delay of embeddings. The value of staleness start with 0, increase one when lookup a batch, decrease one when a batch update its gradients |
nan_grad_skipped | nan gradient count caused by dense part. |
Efficiency related
| Key | Description |
|---|---|
lookup_hashmap_time_cost_sec | time cost of embedding lookup on embedding server, mainly spent on looking up from hash table. |
num_pending_batches | number of batches that are already sent to embedding worker but still waiting for NN worker to trigger lookup. The pending batches are stored in forward buffer, whose capacity is configurable by global_config.yaml. Once the buffer is full, the embedding worker may not accept new batches. |
lookup_preprocess_time_cost_sec | time cost of preprocess for embedding lookup on embedding worker. Include ID hashing, dividing id accroding feature groups and embedding servers. |
lookup_rpc_time_cost_sec | time cost of embedding lookup on embedding worker for a batch, include lookup on embedding server (lookup_hashmap_time_cost_sec) and network transmission. |
lookup_postprocess_time_cost_sec | lookup postprocess time cost on embedding worker, mainly embedding summation. |
lookup_total_time_cost_sec | total time cost of lookup, preprocess and postprocess on embedding worker. lookup_total_time_cost_sec = lookup_preprocess_time_cost_sec + lookup_rpc_time_cost_sec + lookup_postprocess_time_cost_sec |
update_gradient_time_cost_sec | update gradient time cost on embedding worker for a batch. |
Inference
To do inference for trained models, we need to deploy embedding worker, embedding parameter server, and TorchServe server.
When a TorchServe inference server receives requests, it first looks up embeddings on PERSIA services, and then does the forward pass for the DNN part.
TorchServe is a flexible framework for serving PyTorch models. In this page, we will introduce how to deploy a PERSIA model with it.
In the following sections, we first introduce how to create a custom handler for TorchServe to query embeddings during inference. Next, we introduce how to save models during training and load models during inference. Then, we introduce how to deploy various services for inference. Finally, we introduce how to query the inference service to get the inference result. In addition, we also introduce how to keep the model for inference up to date.
- Create PERSIA Handler for TorchServe
- Save and Load PERSIA Model
- Deploy PERSIA Services and TorchServe
- Query Inference Result with gRPC
- Model Update
Create PERSIA Handler for TorchServe
With TorchServe, customized operations (like preprocess or postprocess) can be done with simple Python scripts, called custom handler.
There are ways to write custom handler, one of them is custom-handler-with-class-level-entry-point.
Here is an example to define a custom handler retrieving PERSIA embeddings:
from persia.ctx import InferCtx
from persia.service import get_embedding_worker_services
from ts.torch_handler.base_handler import BaseHandler

from abc import ABC
import torch

device_id = 0 if torch.cuda.is_available() else None


class PersiaHandler(BaseHandler, ABC):
    def initialize(self, context):
        super().initialize(context)
        embedding_worker_addrs = get_embedding_worker_services()
        self.persia_context = InferCtx(embedding_worker_addrs, device_id=device_id)
        self.persia_context.wait_for_serving()

    def preprocess(self, data):
        batch = data[0].get("batch")
        batch = bytes(batch)
        batch = self.persia_context.get_embedding_from_bytes(batch, device_id)

        model_input = self.persia_context.prepare_features(batch)
        return model_input

    def inference(self, data, *args, **kwargs):
        denses, sparses, _ = data
        with torch.no_grad():
            results = self.model(denses, sparses)
        return results

    def postprocess(self, data):
        data = torch.reshape(data, (-1,))
        data = data.tolist()
        return [data]
Save and Load PERSIA Model
The sparse part and the dense part of a PERSIA model should be saved separately when doing inference.
For the dense part, it is saved directly by PyTorch with TorchScript:
jit_model = torch.jit.script(model)
jit_model.save('/your/model/dir/your_dense_model_name.pth')
Then, to serve the dense part with TorchServe, use torch-model-archiver to package it.
torch-model-archiver --model-name your_dense_model_name --version 1.0 --serialized-file /your/model/dir/your_dense_model_name.pth --handler /your/model/dir/persia_handler.py
Sparse model can be saved and loaded with PERSIA Python API, see Model Checkpointing for details.
Deploy PERSIA Services and TorchServe
TorchServe can be launched with:
torchserve --start --ncs --model-store /your/dense/model/dir --models your_dense_model_name.mar
You can config embedding server address(es) and model checkpoint path in global_config.yaml when deploying embedding parameter servers and embedding workers for inference.
common_config:
  job_type: Infer
    servers:
      - emb_server_1:8000
      - emb_server_2:8000
    initial_sparse_checkpoint: /your/sparse/model/dir
Query Inference Result with gRPC
There are ways to get predictions from a model with TorchServe. One of them is using gRPC API through a gRPC client.
The input data is constructed in the same way as in training, Here is an example:
import grpc
import os
import sys
import json

sys.path.append("/cache/proto/")

import numpy as np
from tqdm import tqdm
from sklearn import metrics

import inference_pb2
import inference_pb2_grpc

from data_generator import make_dataloader
from persia.prelude import PyPersiaBatchData


def get_inference_stub():
    channel = grpc.insecure_channel("localhost:7070")
    stub = inference_pb2_grpc.InferenceAPIsServiceStub(channel)
    return stub


def infer(stub, model_name, model_input):
    input_data = {"batch": model_input}
    response = stub.Predictions(
        inference_pb2.PredictionsRequest(model_name=model_name, input=input_data)
    )
    try:
        prediction = response.prediction.decode("utf-8")
        prediction = prediction.splitlines()
        prediction = [x.strip() for x in prediction]
        prediction = [x.replace(",", "") for x in prediction]
        prediction = prediction[1:-1]
        prediction = [float(x) for x in prediction]
        return prediction
    except:
        exit(1)


if __name__ == "__main__":

    test_filepath = os.path.join("/data/", "test.npz")
    _, loader = make_dataloader(test_filepath, batch_size=1024)
    all_pred = []
    all_target = []

    for (dense, batch_sparse_ids, target) in tqdm(loader, desc="gen batch data..."):
        batch_data = PyPersiaBatchData()
        batch_data.add_dense([dense])
        batch_data.add_sparse(batch_sparse_ids, False)

        model_input = batch_data.to_bytes()
        prediction = infer(get_inference_stub(), "adult_income", model_input)

        assert len(prediction) == len(
            target
        ), f"miss results {len(prediction)} vs {len(target)}"

        all_target.append(target)
        all_pred.append(prediction)

    all_pred, all_target = np.concatenate(all_pred), np.concatenate(all_target)

    fpr, tpr, th = metrics.roc_curve(all_target, all_pred)
    infer_auc = metrics.auc(fpr, tpr)

    print(f"infer_auc = {infer_auc}")
Model Update
Sparse Model: PERSIA Incremental Update
Generally, online prediction services need to continuously load the latest model to keep the model for inference up to date, while for huge sparse models, dumping full amount of the model in a short interval always means a huge overhead for systems. Incremental update can fill this gap by dumping a small part of the model which updated recently. so that online prediction services only receives model differences during training to update the online model for inference. This dramatically reduces the model latency between training and inference.
During training, an incremental update file will be dumped periodically. During inference, PERSIA services keep scanning a directory to find if there is a new incremental update file to load.
Relavant configurations in global_config.yaml are enable_incremental_update, incremental_buffer_size and incremental_dir.
Dense Model: TorchServe Management API
Update of the dense part of the model can be achieved using torchserve through its management api. First generate the .mar file for the updated model following the steps described above, then register its path to torchserve with grpc client, and finally deregister the old model.
Model Checkpointing
A PERSIA model contains two parts: the dense part and the sparse part (embeddings). When it comes to saving and loading the model, whether you want to save the dense part and sparse part together or separately, PERSIA model checkpointing API provides handy solutions for both situations.
Checkpointing Together
You can call load_checkpoint or dump_checkpoint in a PERSIA context. Both the dense part and the sparse part will be saved into checkpoint_dir. By default, the model will be saved to the local path. When the path start with hdfs://, the model will be saved to hdfs path.
with TrainCtx(
    model=model,
    embedding_optimizer=embedding_optimizer,
    dense_optimizer=dense_optimizer,
    device_id=device_id,
) as ctx:
    ctx.load_checkpoint(checkpoint_dir)
    if batch_idx % 10000 == 0:
        ctx.dump_checkpoint(checkpoint_dir)
Checkpointing Separately
Since the dense part of a PERSIA model is simply a torch.nn.module, you can use Pytorch API to checkpoint the dense part. See Pytorch tutorials: Saving and Loading Models for guidance on how to save and load model in Pytorch.
For the sparse part, you need to use PERSIA API to do model checkpointing.
In a PERSIA context, you can load or dump the sparse part checkpoint in a directory with the load_embedding, dump_embedding method:
with TrainCtx(
    model=model,
    embedding_optimizer=embedding_optimizer,
    dense_optimizer=dense_optimizer,
    device_id=device_id,
) as ctx:
    ctx.load_embedding(checkpoint_dir, True)
    if batch_idx % 10000 == 0:
        ctx.dump_embedding(checkpoint_dir, True)
Relavant configurations in global_config.yaml are checkpointing_config.
Kubernetes Integration
PERSIA is integrated to Kubernetes as a PersiaJob custom resource. You can define your distributed PERSIA task by a CustomResourceDefinition (CRD). We have learned the basic structure of a PERSIA CRD in the Customize a PERSIA Job section. In this section, we will introduce more details about running PERSIA on a K8s cluster.
- PERSIA Job Name
- Configuring Environment Variables
- Configuring Resources
- Mounting Volumes
- Configuring PERSIA Image
- Configuring Nats Operator
PERSIA Job Name
In a PERSIA CRD, the job name is a unique identifier of the current PERSIA training task. It is important to keep job names different between different PERSIA jobs.
apiVersion: persia.com/v1
kind: PersiaJob
metadata:
  name: you-job-name
  namespace: default
...
Configuring Environment Variables
You can set environment variables for all pods or for a PERSIA module. In the following example, the environment variable GLOBAL_ENV is set for all pods in this job, while the MODULE_RNV is only set on NN workers.
...
spec:
  globalConfigPath: /workspace/global_config.yml
  embeddingConfigPath: /workspace/embedding_config.yml
  ...
  env:
    - name: GLOBAL_ENV
      value: "I will take effect on all pods"

  nnWorker:
    replicas: 1
    nprocPerNode: 1
    ...
    env:
      - name: MODULE_RNV
        value: "I will take effect on NN worker pods only"
...
Configuring Resources
When you specify a PERSIA module, you can optionally specify how much of each resource a container of this module needs. The most common resources to specify are CPU, memory and GPUs. Refer to K8s doc for more details.
...
spec:
  globalConfigPath: /workspace/global_config.yml
  embeddingConfigPath: /workspace/embedding_config.yml
  ...

  nnWorker:
    replicas: 1
    nprocPerNode: 1
    resources:
      limits:
        memory: "24Gi"
        cpu: "12"
        nvidia.com/gpu: "1"
...
Mounting Volumes
Kubernetes supports many types of volumes (see K8s doc). You can mount these volumes to your containers in a PERSIA job. Here is an example:
...
spec:
  globalConfigPath: /workspace/global_config.yml
  embeddingConfigPath: /workspace/embedding_config.yml
  ...
  volumes:
    - name: data
      hostPath:
        path: /nfs/general/data/
        type: Directory

  nnWorker:
    replicas: 1
    nprocPerNode: 1
    volumeMounts:
      - name: data
        mountPath: /data/
        read_only: true
...
Configuring PERSIA Image
You can also specify a docker image for a PERSIA module. Here is an example:
...
spec:
  globalConfigPath: /workspace/global_config.yml
  embeddingConfigPath: /workspace/embedding_config.yml
  ...

  nnWorker:
    replicas: 1
    nprocPerNode: 1
    image: persiaml/persia-cuda-runtime:dev
...
Configuring Nats Operator
While starting a PERSIA training task, we usually need to start a nats service, which can be achieved through nats-operator. PERSIA transmits ID type feature through nats, so you need to ensure that its maxPayload is large enough. Please note that global environment variable PERSIA_NATS_URL should be set to nats://your-nats-operator-name:4222, e.g. nats://persia-nats-service:4222 for the following example.
apiVersion: "nats.io/v1alpha2"
kind: "NatsCluster"
metadata:
  name: "persia-nats-service"
spec:
  size: 1
  natsConfig:
    maxPayload: 52428800
  resources:
    limits:
      memory: "8Gi"
      cpu: "2"
Configuration File References
In order to achieve the best performance on various training and inference jobs, PERSIA servers provide a handful of configuration options via two config files, a global configuration file usually named as global_config.yaml, and an embedding configuration file usually named as embedding_config.yaml. The global configuration allows one to define job type and general behaviors of servers, whereas embedding configuration provides definition of embedding details for individual sparse features.
Global Configuration
Global configuration specifies the configuration of the current PERSIA job. The path to the global configuration file should be parsed as argument --global-config when launching embedding PS or embedding worker.
Here is an example for global_config.yaml.
common_config:
  metrics_config:
    enable_metrics: true
    push_interval_sec: 10
  job_type: Train
  checkpointing_config:
    num_workers: 8
embedding_parameter_server_config:
  capacity: 1000000
  num_hashmap_internal_shards: 1
  enable_incremental_update: false
  incremental_buffer_size: 5000000
  incremental_channel_capacity: 1000
embedding_worker_config:
  forward_buffer_size: 1000
Depending on the scope, global_config was divided into three major sections, namely common_config, embedding_parameter_server_config and embedding_worker_config. common_config configures the job type (job_type) and metrics server. embedding_parameter_server_config configures the embedding parameter server, and embedding_worker_config provides configurations for the embedding worker. The following is a detailed description of each configuration.
common_config
checkpointing_config
num_workers(int, default=4): The concurrency of embedding dumping, loading and incremental update.
job_type
The job_type of PresiaML can be either Train or Infer.
When job_type is Infer, additional configurations including servers and initial_sparse_checkpoint have to be provided. Here is an example:
common_config:
  job_type: Infer
    servers:
      - emb_server_1:8000
      - emb_server_2:8000
    initial_sparse_checkpoint: /your/sparse/model/dir
servers(list of str, required): list of embedding servers each in theip:portformat.initial_sparse_checkpoint(str, required): Embedding server will load this ckpt when start.
metrics_config
metrics_config defines a set of configuration options for monitoring. See Monitoring for details.
enable_metrics(bool, default=false): Whether to enable metrics.push_interval_sec(int ,default=10): The interval of pushing metrics to the promethus pushgateway server.job_name(str, default=persia_defalut_job_name): A name to distinguish your job from others.
embedding_parameter_server_config
embedding_parameter_server_config specifies the configuration for the embedding parameter server.
capacity(int, default=1,000,000,000): The capacity of each embedding server. Once the number of indices of an embedding server exceeds the capacity, it will evict embeddings according to LRU policies.num_hashmap_internal_shards(int, default=100): The number of internal shard of an embedding server. Embeddings are saved in a HashMap which contains multiple shards (sub-hashmaps). Since the CRUD operations need to acquire the lock of a hashmap, acquiring the lock of the sub-hashmap instead of the whole hashmap will be more conducive to concurrency between CRUD operations.full_amount_manager_buffer_size(int, default=1000): The buffer size of full amount manager. In order to achieve better performance, the embedding server does not traverse the hashmap directly during full dump. Instead, Embedding is submitted asynchronously through full amount manager.enable_incremental_update(bool, default=false): Whether to enable incremental update.incremental_buffer_size(int, default=1,000,000): Buffer size for incremental update. Embeddings will be inserted into this buffer after each gradient update, and will only be dumped when the buffer is full. Only valid whenenable_incremental_update=true.incremental_dir(str, default=/workspace/incremental_dir/): The directory for incremental update files to be dumped or loaded.
embedding_worker_config
forward_buffer_size(int, default=1000): Buffer size for prefoard batch data from data loader.
Embedding Config
In addition to global_config, detailed settings related to sparse feature embeddings are provided in a separate embedding configuration file usually named embedding_config.yaml. The path to the embedding config file should be parsed as argument --embedding-config when running PERSIA servers.
Here is an example for embedding_config.yaml.
feature_index_prefix_bit: 8
slot_config:
  workclass:
    dim: 8
    embedding_summation: true
  education:
    dim: 8
    embedding_summation: true
  marital_status:
    dim: 8
    embedding_summation: true
  occupation:
    dim: 8
    embedding_summation: true
  relationship:
    dim: 8
    embedding_summation: true
  race:
    dim: 8
    embedding_summation: true
  gender:
    dim: 8
    embedding_summation: true
  native_country:
    dim: 8
    embedding_summation: true
feature_groups:
  group1:
    - workclass
    - education
    - race
  group2:
    - marital_status
    - occupation
The following is a detailed description of each configuration. required means there are no default values.
-
feature_index_prefix_bit(int, default=8): Number of bits occupied by each feature group. To avoid hash collisions between different features, the firstn(n=feature_index_prefix_bit)bits of an index(u64) are taken as the feature bits, and the last64-nbits are taken as the index bits. The original id will be processed before inserted into the hash table, followingID = original_ID % 0~2^(64-n) + index_prefix << (64-n). Slots in the same feature group share the sameindex_prefix, which is automatically generated by PERSIA according to thefeature_groups. -
slots_config(map, required):slots_configcontains all the definitions of Embedding. The key of the map is the feature name, and the value of the map is a struct namedSlotConfig. The following is a detailed description of configuration in aSlotConfig.dim(int, required): dim of embedding.sample_fixed_size(int, default=10): raw embedding placeholder size to fill 3d tensor -> (bs, sample_fix_sized, dim).embedding_summation(bool, default=true): whether to reduce(summation) embedding before feeding to dense net.sqrt_scaling(bool, default=false): whether to numerical scaling embedding values.hash_stack_config(struct, default=None): a method to represent a large number of sparse features with a small amount of Embedding vector. It means mapping the original ID to0~E (E=embedding_size)throughn (n=hash_stack_rounds)different hash functions, such asID_1, ID_2... ID_n. Each such ID corresponds to an embedding vector, then performs reduce(summation) operation among these embedding vectors, as input to the dense net of the original ID.hash_stack_rounds(int, default=0): Embedding hash rounds.embedding_size(int, default=0): Embedding hash space of each rounds.
-
feature_groups(map, default={}): Feature group division. Refer to the description offeature_index_prefix_bit. Feature in one feature group will share the same index prefix.