Customization
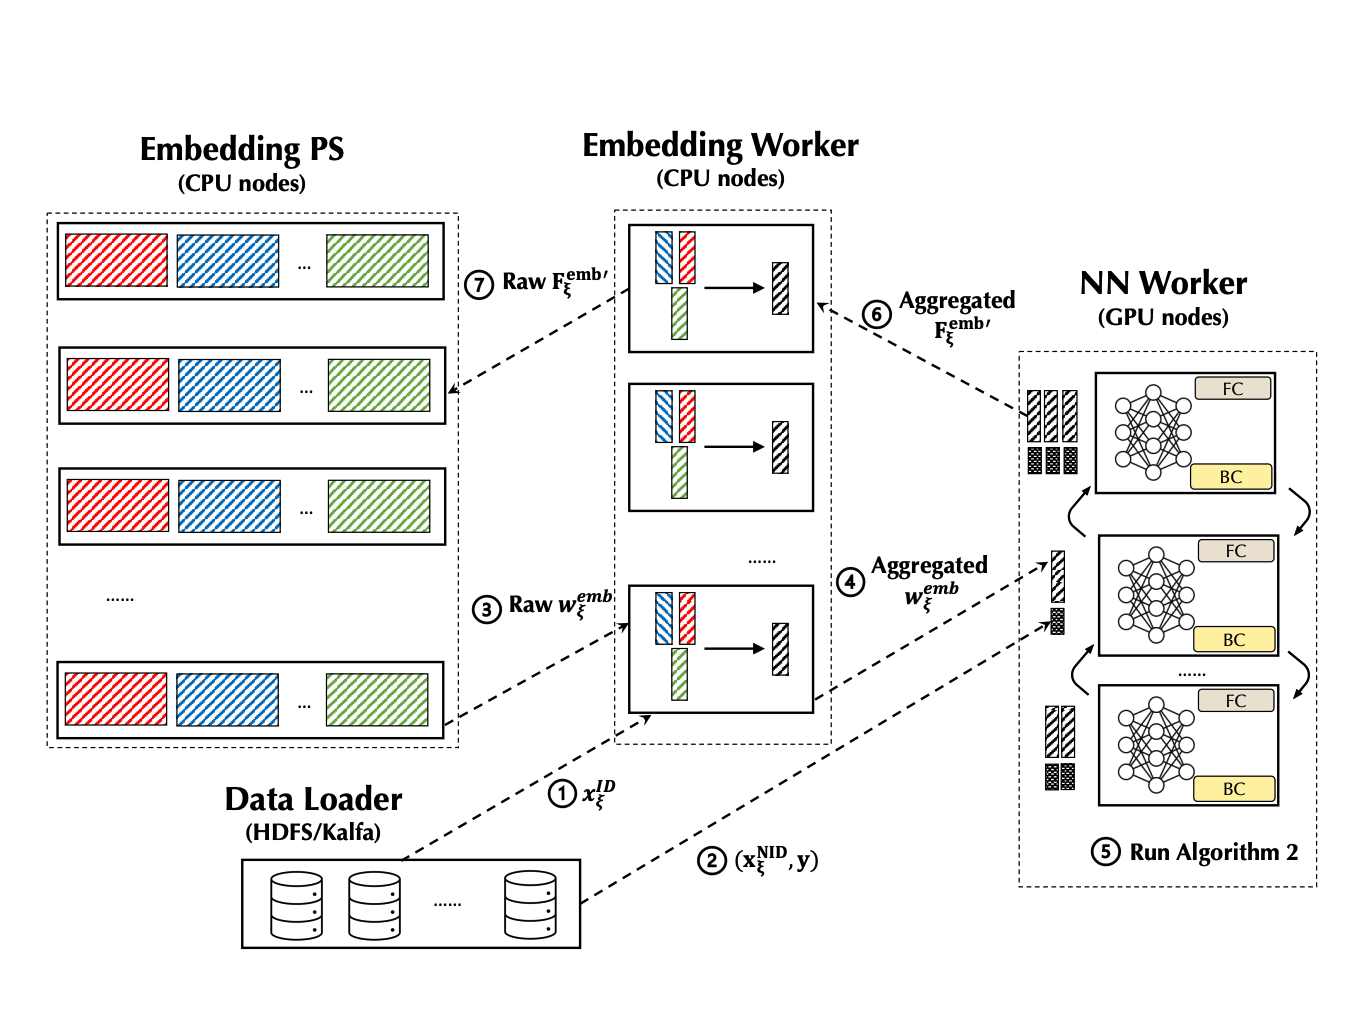
Before we introduce how to customize a PERSIA training task, let's take a look at how PERSIA's different components work together. The training process can be summarized by the following figure:
-
The data loader will dispatch the ID type feature xID(.) to an embedding worker, where the embedding worker will generate a unique sample ID for this sample, buffer this sample ID with the ID type feature xID locally, and return this unique sample ID back the data loader. The data loader will then associate this sample’s Non-ID type features and labels with this unique ID.
-
Next, the data loader will dispatch the Non-ID type feature and label(s) (xNID, y) to an NN worker.
-
Once an NN worker receives this incomplete training sample, it will issue a request to pull the ID type features’(xID) embedding wemb from some embedding worker according to the sample ID . This will trigger the forward propagation according to asynchronous updating algorithm for embeddings, where the embedding worker will use the buffered ID type feature xID to get the corresponding wemb from the embedding PS.
-
Then the embedding worker performs some potential aggregation of original embedding vectors. When this computation finishes, the aggregated embedding vector wemb will be transmitted to the NN worker that issues the pull request.
-
Once the NN worker gets a group of complete inputs for the dense module, it will create a mini-batch and conduct the training computation of the NN according to synchronous updating algorithm for NN parameters. Note that the parameter of the NN always locates in the device RAM of the NN worker, where the NN workers synchronize the gradients by the AllReduce Paradigm.
-
When the iteration of synchronous updating is finished, the NN worker will send the gradients of the embedding (Femb') back to the embedding worker (also along with the sample ID ).
-
The embedding worker will query the buffered ID type feature xID according to the sample ID , compute gradients Femb' of the embedding parameters and send the gradients to the embedding PS. Finally, the embedding PS will compute the updates to the embedding parameters using the gradients and update the embedding parameters.
There are a few files you can customize in PERSIA:
- Data preprocessing configuration file:
data_loader.py, the file location can be specified using the environment variablePERSIA_DATALOADER_ENTRY. See Training Data for details. - Model definition configuration file:
train.py, the file location can be specified using the environment variablePERSIA_NN_WORKER_ENTRY. See Model Definition for details. - Embedding configuration file:
embedding_config.yaml, the file location can be specified using the environment variablePERSIA_EMBEDDING_CONFIG. See Embedding Configuration for details. - Embedding PS configuration file:
global_config.yaml, the file location can be specified using the environment variablePERSIA_GLOBAL_CONFIG. See Configuring Embedding Parameter Server for details. - Launcher configuration:
- If you are using K8s,
k8s.train.yaml. See K8s launcher for details. - If you are using docker compose,
docker-compose.ymland.docker.env. See Docker Compose Launcher for details. - If you are using honcho,
Procfileand.honcho.env. See Honcho Launcher for details.
- If you are using K8s,
Training Data
In PERSIA, we use the PersiaBatch data structure to encode the training data. PersiaBatch typically consists of three parts: ID Type Feature, Non-ID Type Feature and Label.
Add ID Type Feature
IDTypeFeature declares categorical data with variable length. It is a sparse matrix (List[np.array]) in LIL format. Note that it only accepts np.uint64 elements.
For example, you can put user_id and photo_id data into the IDTypeFeature separately.
import numpy as np

from persia.embedding.data import IDTypeFeature

id_type_features = []

# add user_id data
user_id_batch_data = [
  np.array([1000, 1001], dtype=np.uint64),
  np.array([1000,], dtype=np.uint64),
  np.array([], dtype=np.uint64), # allow empty sample
  np.array([1000, 1001, 1024], dtype=np.uint64),
  np.array([1000,] * 200, dtype=np.uint64),
]
id_type_features.append(IDTypeFeature(user_id_batch_data, "user_id"))

# add photo_id data
photo_id_batch_data = [
  np.array([2000, 1001], dtype=np.uint64),
  np.array([3000,], dtype=np.uint64),
  np.array([5001], dtype=np.uint64),
  np.array([4000, 1001, 1024], dtype=np.uint64),
  np.array([4096,] * 200, dtype=np.uint64),
]
id_type_features.append(IDTypeFeature(photo_id_batch_data, "photo_id"))
After generating IDTypeFeature, you have to config this id_type_feature in embedding_config.yml. See configuration for more details about how to config the id_type_feature, such as dim, sqrt_scaling, etc.
more advanced features: id_type_feature processing
Add Non-ID Type Feature
You are also able to add multiple NonIDTypeFeature into a PersiaBatch with various datatype. Stacking multiple non_id_type_features with same datatype horizontally into one np.array can avoid memory fragmentation and reduce the time of type check. For example, you are able to add the NonIDTypeFeature with datatype in float32, uint8 or else.
import numpy as np

from persia.embedding.data import NonIDTypeFeature

non_id_type_features = []

# height data
height_batch_data = np.array([
  [170],
  [183],
  [175],
  [163],
  [177],
], dtype=np.float32)

non_id_type_features.append(NonIDTypeFeature(height_batch_data, name="height"))

# income data
income_batch_data = np.array([
  [37000],
  [7000],
  [2000],
  [6660],
  [3000],
], dtype=np.float32)

non_id_type_features.append(
  NonIDTypeFeature(income_batch_data, name="income")
)

# add income_with_height
income_with_height = np.hstack([height_batch_data, income_batch_data])
non_id_type_features.append(
  NonIDTypeFeature(income_with_height, name="income_with_height")
)

# add five image data with RGB channel
image_data = np.ones((5, 224, 224, 3), dtype=np.uint8)
non_id_type_features.append(NonIDTypeFeature(image_data, name="LSVR_image"))
more advanced features: non_id_type_feature processing
Add Label
Adding a label is the same as the NonIDTypeFeature. You can add label data with different datatypes such as bool, float32, etc.
import numpy as np

from persia.embedding.data import Label

labels = []
# Add ctr label data
ctr_batch_data = np.array([
  0,
  1,
  0,
  1,
  1
], dtype=np.bool)

labels.append(Label(ctr_batch_data, name="ctr"))

# Add income label data
income_batch_data = np.array([
  [37000],
  [7000],
  [2000],
  [6660],
  [3000],
], dtype=np.float32)
labels.append(Label(income_batch_data, name="income"))

# Add ctr with income, but will cost
# extra bytes to cast ctr_batch_data from bool to float32
ctr_with_income = np.hstack([ctr_batch_data, income_batch_data])
labels.append(Label(ctr_with_name, "ctr_with_income"))
more advanced features: label processing
Send PersiaBatch
Use persia.ctx.DataCtx to send PersiaBatch to nn_worker and embedding_worker:
import numpy as np

from persia.ctx import DataCtx
from persia.embedding.data import PersiaBatch, IDTypeFeature

id_type_features = [
  IDTypeFeature("empty_sample", np.array([[]] * 5, dtype=np.uint64))
]

persia_batch = PersiaBatch(
  id_type_features,
  requires_grad=False
)

with DataCtx() as ctx:
  ctx.send_data(persia_batch)
Model Definition
Model definition includes the following three parts.
Define DNN Model
You can define the DNN model structure any way you want. Only note that the signature of the forward function should be the same as shown below.
from typing import List

import torch

class DNN(torch.nn.Module):
    def forward(
      self,
      non_id_type_feature_tensors: List[torch.Tensor],
      id_type_feature_embedding_tensors: List[torch.Tensor]
    ):
        ...

model = DNN()
Modify Embedding Optimizer
There are several kinds of embedding optimizers in PERSIA. For more details, see api doc.
from persia.embedding.optim import SGD, Adagrad, Adam
from persia.ctx import TrainCtx

sgd_embedding_optimizer = SGD(1e-3)
adagrad_embedding_optimizer = Adagrad(1e-3)
adam_embedding_optimizer = Adam(1e-3)
Customize PERSIA Training Context
After model and embedding optimizer have been defined, a PERSIA training context should be created to acquire the Dataloder and manage the embedding.
# train.py

from torch import nn
from torch.optim import SGD

from persia.ctx import TrainCtx
from persia.data import StreamingDataset, Dataloader
from persia.env import get_local_rank
from persia.embedding.optim import Adagrad

prefetch_size = 10
dataset = StreamingDataset(prefetch_size)

local_rank = get_local_rank()

device_id = get_local_rank()
torch.cuda.set_device(device_id)
model.cuda(device_id)

# DNN parameters optimizer
dense_optimizer = SGD(model.parameters(), lr=0.1)
# Embedding parameters optimizer
embedding_optimizer = Adagrad(lr=1e-3)

with TrainCtx(
    model=model,
    embedding_optimizer=embedding_optimizer,
    dense_optimizer=dense_optimizer,
    device_id=device_id,
) as ctx:

    train_data_loader = Dataloader(dataset)
    for (batch_idx, data) in enumerate(loader):
      ...
more advanced features: TrainCtx
Configuring Embedding Worker
An embedding worker runs an asynchronous updating algorithm for getting the embedding parameters from the embedding parameter server, aggregating embedding vectors (potentially) and putting embedding gradients back to the embedding parameter server. If you are interested in the details of the system design, please refer to Section 4.2 in our paper. In most of the cases, the only configuration you need to adjust is the number of instances and resources, based on your workload. See K8s launcher.
Configuring Embedding Parameter Server
An embedding parameter server manages the storage and update of the embedding parameters according to LRU policies. So you need to configure the capacity of the LRU cache in the configuration file according to your workload and available memory capacity. In addition, the capacity of embedding-parameter-server means the max number of embedding vectors, not the number of parameters. Here is an example:
# global_config.yaml

common_config:
  job_type: Train
embedding_parameter_server_config:
  capacity: 1000000
more advanced features: See Configuration
Launcher Configuration
There are several launchers to help you launch a PERSIA training task.
- K8s launcher: Kubernetes launcher is the easiest for deploying large-scale training.
- docker-compose launcher: Docker compose is another way like
K8sbut is more lightweight. - honcho launcher: You can build PERSIA (Currently persia can build in linux, macOS, windows10) manually when using a Procfile manager, which is friendly for developers.
All of these launchers use environment variables(PERSIA_GLOBAL_CONFIG, PERSIA_EMBEDDING_CONFIG, PERSIA_NN_WORKER_ENTRY, PERSIA_DATALOADER_ENTRY) to assign the path of the PERSIA configuration files.
K8s Launcher
When launching PERSIA training tasks with K8s, PERSIA is added as a custom resource to your Kubernetes cluster, defined using CustomResourceDefinition (CRD).
Here is an example of a PERSIA CRD:
# k8s.train.yaml

apiVersion: persia.com/v1
kind: PersiaJob
metadata:
  name: adult-income  # persia job name, need to be globally unique
  namespace: default  # k8s namespace to deploy to this job
spec:
  # path of PERSIA configuration files.
  persiaEnv:
    PERSIA_GLOBAL_CONFIG: /home/PERSIA/examples/src/adult-income/config/global_config.yml
    PERSIA_EMBEDDING_CONFIG: /home/PERSIA/examples/src/adult-income/config/embedding_config.yml
    PERSIA_NN_WORKER_ENTRY: /home/PERSIA/examples/src/adult-income/train.py
    PERSIA_DATALOADER_ENTRY: /home/PERSIA/examples/src/adult-income/data_loader.py
  env:
    - name: PERSIA_NATS_URL
      value: nats://persia-nats-service:4222  # hostname need to be same with nats operator's name

  embeddingParameterServer:
    replicas: 1
    resources:
      limits:
        memory: "24Gi"
        cpu: "4"

  embeddingWorker:
    replicas: 1
    resources:
      limits:
        memory: "24Gi"
        cpu: "4"

  nnWorker:
    replicas: 1
    nprocPerNode: 1
    resources:
      limits:
        memory: "24Gi"
        cpu: "12"
        nvidia.com/gpu: "1"
    env:
      - name: CUBLAS_WORKSPACE_CONFIG
        value: :4096:8
      - name: ENABLE_CUDA
        value: "1"

  dataloader:
    replicas: 1
    resources:
      limits:
        memory: "8Gi"
        cpu: "1"

---
# a nats operator
apiVersion: "nats.io/v1alpha2"
kind: "NatsCluster"
metadata:
  name: "persia-nats-service"
spec:
  size: 1
  natsConfig:
    maxPayload: 52428800
  resources:
    limits:
      memory: "8Gi"
      cpu: "2"
more advanced features: See kubernetes-integration
Docker Compose Launcher
.docker.env and docker-compose.yml are the files you can customize when launching PERSIA training task with docker-compose. The following are steps to customize a PERSIA training task.
Configuring Environment
You are able to set PERSIA task environment variables following the Docker official docs.
The Environment definition:
PERSIA_EMBEDDING_CONFIG: Path to PERSIA embedding configuration file.PERSIA_GLOBAL_CONFIG: Path to PERSIA embedding PS configuration file.LOG_LEVEL: log level forembedding-workerandembedding-parameter-server.
# .docker.env

PERSIA_NN_WORKER_ENTRY=/workspace/train.py
PERSIA_DATALOADER_ENTRY=/workspace/data_loader.py
PERSIA_EMBEDDING_CONFIG=/workspace/config/embedding_config.yml
PERSIA_GLOBAL_CONFIG=/workspace/config/global_config.yml.yml

LOG_LEVEL=info
Configuring Docker-Compose File
You can add multiple data_loader, embedding_worker and embedding_parameter_server services by the following configuration.
version: "3.2"
services:
  data_loader1:
    env_file:
      - .docker.env
    depends_on:
      - nn_worker
      - embedding_worker
      - persia_nats_service
    image: persiaml/persia-cuda-runtime:latest
    command: persia-launcher data-loader --replica-index 0 --replica-size 2
    volumes:
      - type: bind
        source: . # mount current directory into container
        target: /workspace
    deploy:
      restart_policy:
        condition: on-failure

  data_loader2:
    env_file:
      - .docker.env
    depends_on:
      - nn_worker
      - embedding_worker
      - persia_nats_service
    image: persiaml/persia-cuda-runtime:latest
    command: persia-launcher data-loader --replica-index 1 --replica-size 2
    volumes:
      - type: bind
        source: .
        target: /workspace
    deploy:
      restart_policy:
        condition: on-failure
NOTE: You can also use the
replicaskeyword in docker-compose swarm mode to launch multiple services at once. But you will need to parse the .TASK.SLOT intoreplica_indexand feed it todata-loader.
Honcho Launcher
It is possible to simulate distributed environment when using Honcho launcher. You may need to customize these files: Procfile, .honcho.env.
Configuring Env
There are two environment variables that you can customize when launching a PERSIA task with Honcho:
PERSIA_NATS_URL: set for nats-server url.LOG_LEVEL: set log_level forembedding-workerandembedding-parameter-server.
# .honcho.env
# default nats_server ip address
PERSIA_NATS_URL=nats://0.0.0.0:4222

LOG_LEVEL=info
Configuring Procfile
You can add multiple replicas of PERSIA modules in Procfile.
For example, by adding embedding_parameter_server0, embedding_parameter_server1 and embedding_parameter_server2, you can launch three subprocesses of embedding_parameter_server in different web server ports.
# Procfile

# launch three subprocesses of embedding parameter server
embedding_parameter_server0: persia-launcher embedding-parameter-server --embedding-config config/embedding_config.yml --global-config config/global_config.yml --replica-index 0 --replica-size 3 --port 10000
embedding_parameter_server1: persia-launcher embedding-parameter-server --embedding-config config/embedding_config.yml --global-config config/global_config.yml --replica-index 1 --replica-size 3 --port 10001
embedding_parameter_server2: persia-launcher embedding-parameter-server --embedding-config config/embedding_config.yml --global-config config/global_config.yml --replica-index 2 --replica-size 3 --port 10002
Build PERSIA Runtime Image Locally
You can also build PERSIA runtime image from source code, and use your customized docker image to launch a PERSIA training task by both Kubernetes and docker-compose.
Use the following instructions to build persia-runtime-image:
git clone https://github.com/PersiaML/PERSIA.git
# docker image name: persiaml/persia-cuda-runtime:dev
cd PERSIA && IMAGE_TAG=dev make build_cuda_runtime_image -e
Deploy Trained Model for inference
See Inference.